How To Clean Beehives: Step-by-Step Beginners Guide
A colony of bees may fail due to a number of diseases and pests. The hive can then be cleaned and used to house a new colony of bees. Beekeepers must take extra care when cleaning to avoid a recurrence of colony deaths.
To clean beehives, remove every frame, then scrape off as much wax as you can with your hive tool. Place the frames in a big freezer for at least 24 hours to kill wax moths. Submerge the frames in a boiled water and washing soda solution for two minutes. Then put the frames somewhere where they can dry completely.
Bees do a good job of maintaining their hives. Beekeepers also have to take care of hives that have been abandoned or colonies where all the bees have perished. It's crucial to clean them properly for the new inhabitants.
Summary
- Beehives can be cleaned and reused for new batches of colonies.
- If black mold is present, it is best to completely discard the hive foundation.
- The beehive frames, honey, and comb are all recyclable.
On this page:
Steps On How To Clean Beehives
First, as soon as it's practical, remove the dead hive from the bee yard. Unprotected honey is a target for robbery by many animals in the wild and in other colonies. Inside the hive, moisture can accumulate and encourage the growth of mold.
These hives can be used again for new colonies. Clean them properly to stop whatever killed the prior hive from posing issues for the new inhabitants. Bacteria, fungi, mites, and other pests might continue to infect the newly introduced bees if the hive is not cleaned properly.
-
To make cleanup simple, start by covering your entire work area with brown paper or a plastic sheet.
-
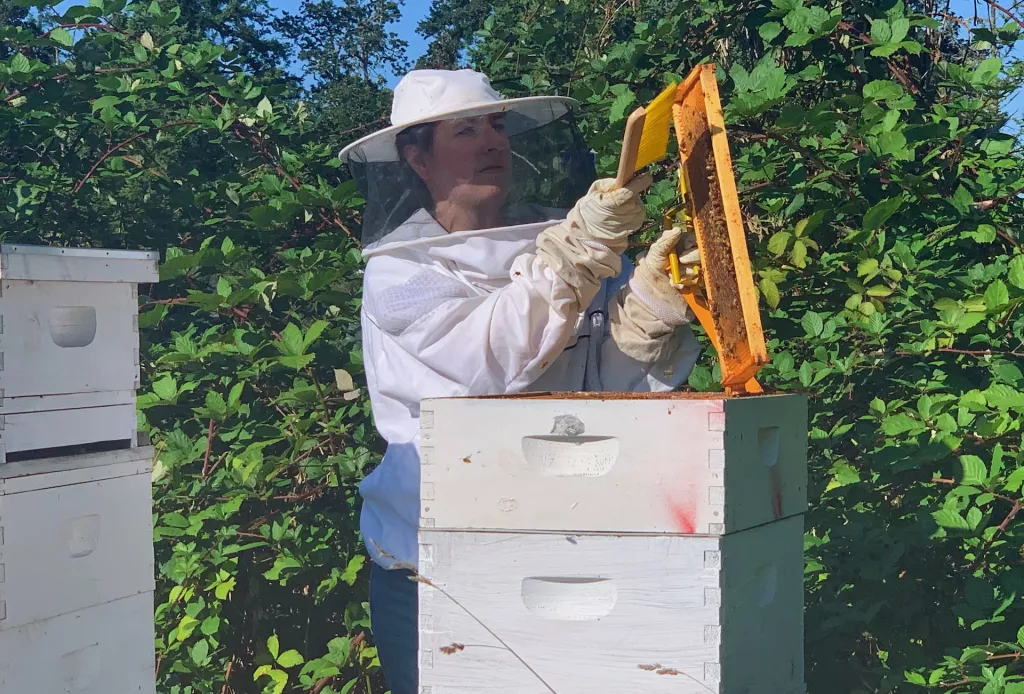
Your hives should be disassembled. Start by taking out every frame from the hive.
-
Check for soft spots. Any soft areas should be painted later on with wood hardener to keep the wood from further deterioration. However, if the area is too bad, throw them away and do not proceed cleaning. It is creating holes in your beehives. Holes create new openings, which promote robbery. Your frames will last longer if it is painted.
-
If the hive had a confirmed disease or infestation, remove as much remaining wax as you can while being careful to burn all removed material.
-
Use a scraper to get rid of any last bits of wax after removing the majority of it. The bees will cover everything with wax and propolis, and you must remove it with your hive tool to ensure that your boxes fit tightly together. All the extra wax is scraped into a pile, cleaned, and melted for later use.
-
When cleaning the internal corners of the boxes and the frame, use extra care, as they offer the perfect nooks and crannies where viruses and pests may hide. Replacing the old frame runners with new ones is a fantastic idea. You can even use a propane torch to clean your boxes by circling the interior of the hive body with it. This will give the frame a rich brown color. However, be sure not to burn your hives.
-
Frequently remove the cleaned frames and put them in a big freezer, such as a chest freezer. Freezing temperatures effectively eliminate all stages of hive pests, including wax moths and mites. This lessens the chance of the infection spreading again. All the old, drawn frames should be placed in a big freezer for at least 24 hours.
-
Sterilize the frames in a washing soda solution. Make a solution strong enough to fill your soaking tub by mixing one pound of washing soda (sodium carbonate) with one gallon of water. That can also be two gallons of water, one cup of salt, and 1/4 cup of vinegar.
-
The solution should be heated to boiling before being poured into the tub in order to completely eliminate any bacteria, fungi, viruses, or other impurities. Beekeepers should proceed with the utmost caution at this stage. It is advised to wear protective clothing, waterproof and heat-resistant gloves, and protective eyewear.
-
Once the solution is ready and heated, dip each frame into it with a rope or string.
-
For two minutes, fully submerge the frame. When you remove it, shake any excess wax and water back into the boiler after the wooden beehive frame has been in the boiler for two minutes. Then you should put it somewhere where it can dry completely. Typically, wooden frames don't deform following this treatment.
-
Since wax moths don't like light, store drawn comb and dry frames in a potting shed by stacking the boxes at a 90-degree angle to let light enter. Additionally, surround any wax-drawn combs with mousetraps because mice will nest inside the frames and generally wreak havoc.
-
Frequently check your stored frames to make sure the wax moths haven't already made their presence known.
How To Clean Beehive Foundation
The simplest way to clean the plastic foundation is to scrape wax and propolis off of it using your hive tool. Utilize the flattened side without causing any damage to the foundation.
You can also clean your foundation with water under high pressure. The pressure does the work of removing the chunks or flakes of wax together with the cocoons in the comb. When washing plastic foundation with water, wear clothing that is water-resistant.
Water can also be heated in a large container and used to melt wax off the plastic foundation. Heat the water to about 195° F and keep it there during the cleaning procedure. Dip and remove your plastic foundation from the water.
Do not soak the foundation in hot water for an extended period of time, since it could deform. Wax melts off the foundation as it is submerged in water, carrying any debris on it with it.
Do not attempt to boil the plastic foundation in water, and do not clean them in your dishwasher or laundry machine.
How To Clean Moldy Beehives
Take the frames to a dry, moderately warm location to allow any extra moisture to dissipate. This process could take a few days.
Put these items where they won't bother you because they have an unpleasant scent.
Any frames that have been molded together should be separated and let to air dry. The mold growth will initially slow down and finally halt as they dry.
When the combs are completely dry, you can store them in an empty super. You can set the moldy super on top of a large, active colony as it grows in number in the spring. Insert a few frames at a time into a strong, sizable, and healthy colony.
You can distribute the frames among your colonies if you have more than one. In a couple of days, the bees will clean and polish every cell.
If you have multiple colonies, you can either distribute the moldy frames among them or give them a few at a time.
The bees may need several days to clean the frames, but once they do, there will be no trace that the mold ever existed. The combs will be available for honey storage or brood rearing.

If necessary, you can also remove the mold from the hive by yourself. This can give your bees more time to focus on pollinating.
However, clean a beehive that has mold that isn't black mold. Start by removing any honey caps and frame mold with a damp cloth.
Scrub more vigorously if any stains are very difficult to remove. Add salt to the cleaning solution you're using for particularly challenging areas.
Then, air out the pieces and freeze them for new usage. When freezing, be sure to save as much of the comb as possible. The frames, honey, and comb are all recyclable in the hive.
If you find black mold, it’s advisable to entirely discard the foundation. It can also be melted and used for other purposes if you'd rather not reuse it in its original form.
Can You Use Bleach To Clean Beehives?
Sodium hypochlorite is more commonly referred to as bleach. It works great for cleaning hive parts when diluted to a 2-4% solution. But because it's water-based, wax or propolis will prevent it from penetrating them, so you must first make sure all wax or propolis are removed.
Once every frame and bee box have been cleaned up, remove the propolis and wax with a scraper before soaking them in the bleach/water solution.
Soak the frames for 10 minutes in a one part bleach to five parts water solution. This sanitizes the frames and aids in cleaning any stray bug eggs.